
Getting Started:
Creating your first script can involve a number of different things. In this section, we are going to cover the basics of building a script that most users will find helpful. We won’t get into the deep details or advanced editing with this. Instead, we want to make sure you have a solid guide for getting started. If you haven’t completed the Installation and Setup (https://mediashout.com/docs/mediashout-7-user-guide/getting- started/installation-and-setup/) page yet, we encourage you to do that before building your first script.
With MediaShout 7 open to the Launch Screen, simply click the button for Create a New Script in the top left. As a note, you can also go to the File Menu->New Script or use CTRL+N to create a new script. There are many more Hot Key Combinations like this to make creating and building your presentation very easy.
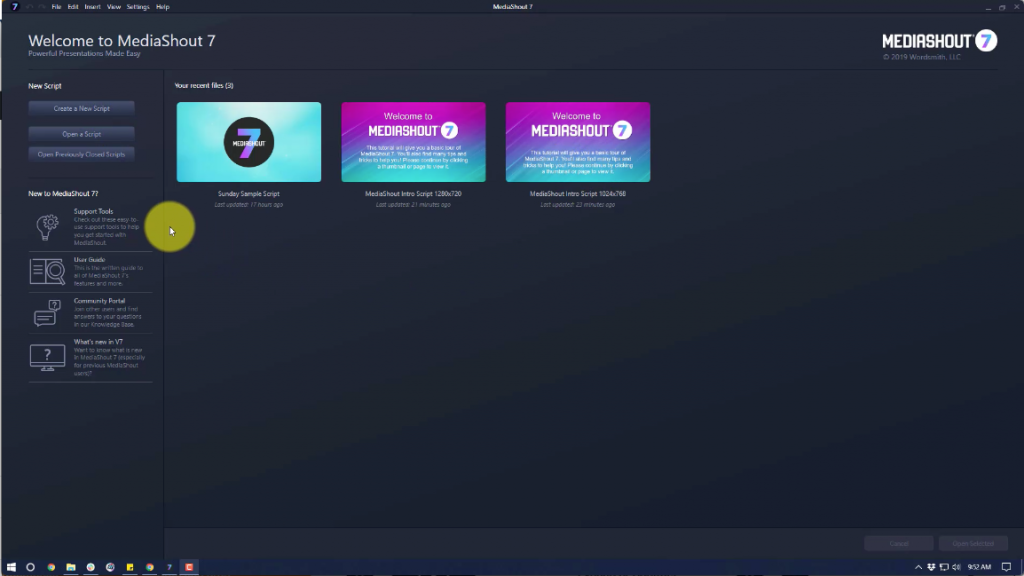
The Launch Screen in MediaShout 7
Creating a new script:
- When you create your new script, it will be called “Untitled”. You can go ahead and save it by going to File->Save, giving it a name in the window that appears and choosing the location, and then saving it. Also, just like a web browser, you can have multiple scripts open as tabs (up to 10), which will allow you to jump between different presentations as you need.
Auto-Save:
One of the new features of MediaShout 7 is the Auto-Save which will automatically save your presentation every 10 minutes once it is saved the first time. You can turn this off in the Setting Menu if you would like.
- While in the Settings Menu, you can also set default folders for your Image and Video Library. These are the folders that will populate the Library Tab (we will use this later on, so don’t worry if you don’t know what to make it just yet).
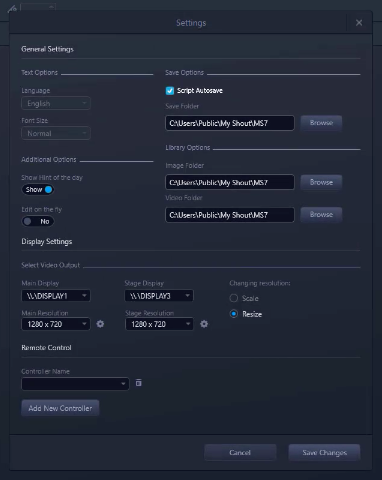
Settings Window
Now that we have everything setup, we will start by entering our worship songs to begin in our script.
Inserting Lyrics:
- To insert your first lyric, press the Insert Lyric Cue icon in the Main Ribbon.
- Once that window opens, you can search in the top part of the library for name or lyric that follows your search criteria. Note: the search will look for exact wording and phrases as you have them typed. You can also scroll through your list of lyrics on the left in the All Folder. MediaShout includes a set of Public Domain lyrics to get you started, but you can add to those easily by clicking the “+” icon in the bottom left or by using the SongSelect service (internet access and SongSelect subscription required).
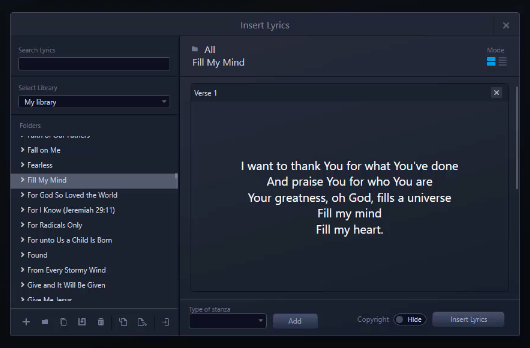
Insert Lyric Window
You can expand a title of a song to see author and copyright information and use the scroll bar on the right to preview the contents of the song. Don’t worry about the formatting at this point, as you will do that in the Edit Area of the script. If you want the Copyright Info to show on your Main Display automatically, make sure the Copyright toggle is marked Show next to the Insert Lyric button. Pressing the Insert Lyric button in the bottom right will add the selected lyric to your script. That’s it. You’ve added your first cue to your script!
Create a lyric from scratch:
- If you do have to create a new lyric from scratch, just click the “+” button in the bottom left of the Insert Lyric Window to get started.
- Give it a name and click “Add” and it will now be in your library.
- On the left side, you can click to the right of the colons to add Authors and Copyright information, too.
- In the right section, type or copy/paste the lyrics into the first verse (which is automatically created when you create the lyric). You don’t have to worry about formatting at this point.
Adding stanzas:
- To add more stanzas, choose the stanza type at the bottom you want next and click “Add”. It will auto-number your stanzas as needed. Repeat the process for any other stanzas you need to add.
- Once completed, you can adjust the play order by clicking the list view in the top right and then drag and drop stanzas as you need or add existing stanzas from the drop down if you need to have them more than once.
- Once done, you can click the Insert Lyric to add it to your script.
- While you are at it, go ahead and add a few more songs to your script, so that you have 3 or 4 songs inserted.
- Then click the “X” in the top right to close the Window once you are done. Just remember that your Insert Lyric Window is designed for creation of lyrics, importing of lyrics, and first time setup of lyrics. Once you have inserted the lyric and then begun formatting it (with fonts, styles, backgrounds, etc.) then you will save it to the new Cues Library Plug-In for future use.
Editing Lyrics:
Now that we have some lyrics, it is time to format them to look the way we want. The first thing to do is the Background.
- Select one of your lyrics and then click on the Layers Tab of your Control Screen.
- There you will click the Background button below the layers of text.
- From there, you can add a color background, and image background, or a video background.
- To select one of the media files, just click Choose from Library or the Browse Folder icon in either Image or Video, then choose a file from your computer.
- Once you have the background selected, click Save Changes to apply it to that cue. You will now notice that the background goes through all pages of that cue.
Font and font style:
- Now, let’s work on the font and font style. Select the text box in the Edit Area (or in the Layer’s Tab) of the text you want to edit.
- Once the text box is selected, you will notice the Edit Ribbon above the Edit Area change to give you formatting tools for text. Click any of the options to adjust the font, size, color, or style to your preference. You can also adjust alignment or add Outline or Shadow effects by clicking the FX button.
- To apply any changes you have made to this text box to the other stanza text boxes on other pages, just right-click on the text box and choose “Apply Formatting to All Pages.”
You can optionally apply Transitions to the Text Box Object or the Page (or even entire Cue) by going to the Transition Plug-In on the right, choosing the transition and its settings, and then clicking Apply. Notice that there are additional options next to the Apply button to expand the Transition to more than just what is selected.
Finally, you can adjust text on each page and actually force text to a new page by using the Page Break function, which is done by placing your cursor where you want the break to occur and then holder CTRL and pressing
ENTER. This will force the text past the cursor to go to a new page in your stanza. For instance, if you had 8 lines of text on Verse 1 and decided you wanted to split it into 2 pages with 4 lines each, you could place your
cursor at line 5 and press CTRL+ENTER and now you have Verse 1a and Verse 1b. If you ever want to remove a Page Break, simply place your cursor at the beginning of the text on the page after the break and hit Backspace to remove it. Your text will join together again.
Ordering stanzas:
- If you need to order your stanzas even after inserting them, you simply drag them around in the Page Area of the Cue in the Script. You can also copy and paste stanzas to add more instances of them.
- If you want to add a blank page (for intro, musical interludes, etc.), click the “+” button below the Cue Thumbnail in the script to add a new page. You can then rename it (by double-clicking on the name) or drag it around to wherever you want the blank page to be.
Once all editing has been finished, we recommend saving the lyric to your Cues Library if you want to use it again. To do that, click the Star Icon below the Cue Thumbnail in the script and you will see it light up. Then it will be available in your Cues Library with all of the edits ready for the next time you want to use it.
Using Presets to Save Formatting:
You can easily save your formatting styles of a text box for use on other text boxes in the form of Presets. This prevents you from having to repetivily format different text boxes the same way over and over.
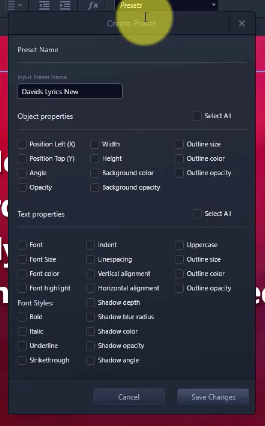
- To create a Preset, simply select the text box and then click the Presets drop down in the Edit Ribbon above the Edit Area.
- Click the “Enter new preset name” area and enter a name for the preset.
- Once you do that a window will appear that will allow you to choose ANY of the available settings to save with that Preset. This way, you can be specific about what gets saved to the preset and what doesn’t.
Apply a preset:
- To apply a saved Preset, simply select another Text Box and click the Preset drop-down and choose the Preset you want to apply. That’s it. You can save and apply Presets for different object types, too, including images and videos.
Combining Presets with the Apply Formatting to All Pages will allow you to format your Cues quickly and easily. For each of your lyrics, just follow the above for setting your background and formatting and you are all done with lyrics. Let’s move on.
Text and Media Cues:
For preparing for our Sermon Slides, we can use a Blank Cue to start.
- To insert a Blank Cue, click the Blank Cue Icon in the Main Ribbon, give it a name, and then press Create.
- Insert a Background just like you did for the lyrics earlier by going to the Layers Tab and clicking Background.
- Then, insert a regular Text Box by clicking the Insert Text Box Object icon in the Main Ribbon.
- From there, type any text into the new text box (like a sermon title or point).
- Just like with Lyrics, you can now apply formatting and styles from the Edit Ribbon above the Edit Area. As a reminder, you can create Presets for any Text Box formatting that you might be reusing to save yourself time.
- Now add another Page to this Cue by clicking the “+” button below the Cue Thumbnail. You can copy the text box from the first page and paste it on the second page by using your right-click context menu or the Hot Keys CTRL+C (Copy) and CTRL+V (Paste).
You can also add a Media File (like an Image or Video) to this page by clicking the Insert Media icon in the Main Ribbon. This will open a Windows Explorer box where you can select any media file on your computer. Once inserted, you can resize, crop, or edit it as you wish using the tools in the Edit Ribbon. Note: If your media files are in the folder that you set as your Library early on, then you can go to the Library Tab in the Control Screen and drag and drop images and videos from the Library Tab directly into the Edit Area to add them as objects. Just like with text boxes, you can also use the FX Window with Images and Videos to add an outline, shadow, or even filters with images.
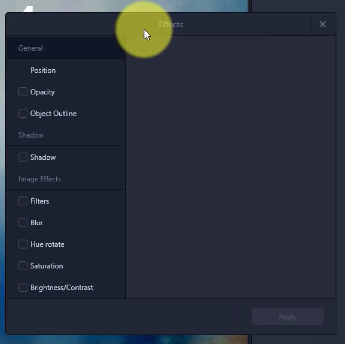
FX Window for Images
These same tools can be used to build additional sermon slides but also Announcements, Offering Slides, and more as you need. Also, specifically for Pastors, is our new Sermon Builder Plug-In, which is designed to make it easy and fast for a Pastor to build their Sermon Slides in MediaShout without having to know anything about how MediaShout works. You can learn more about this tool in the Sermon Builder Plug-In page of this User Guide.
Inserting Scripture:
- To insert a Bible Cue, click the Insert Bible Cue icon in the Main Ribbon.
- In the window that opens, choose a Translation, Book, and Chapter on the left. When you do that, the middle section will populate with all the verses from the selected chapter. You can select one verse at a time, use SHIFT to select a group of verses, click Select All to get all the verses, or even choose any verse, even non-consecutive ones. You can also type your reference in the top portion of this window if you know exactly what scripture you want.
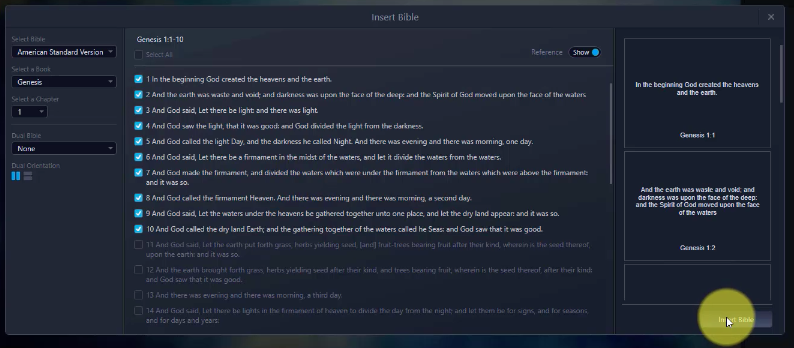
Insert Bible Window:
- When you are done selecting, click the Insert Bible button in the bottom right.
- You can add additional Bible Cues by doing the same steps or click the “X” in the top right to close the Insert Bible Window.
- Once inserted, you can edit the font, style, background, and more just like you did with a lyric. You can also save Presets for your Bible Text to use on other Bible Text Boxes throughout your Script.
- Once you have your Sermon Cues and your Scripture Cues (and any other Cues), you can rearrange them by simply dragging the Cue Name or Cue Thumbnail in the Script Area and moving the Cue up or down in the Script to place it between other Cues.
- Once you have all of the Cues and Pages in the order you want and formatted the way you need, then you are ready to Play your presentation. Don’t forget to add any Cues to your Cues Library that you want to use again in the future.
That’s it! There are many more tools and features you can use to build, edit, and create with MediaShout 7, but we just wanted to cover the basics in this first Script. Now you are ready to move on and play your Script.