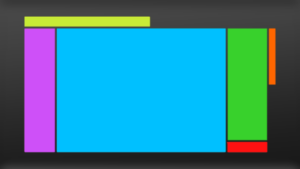
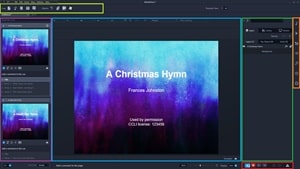
The Control Screen is the screen the operator sees on their computer monitor. This is the heart of MediaShout 7 where edits are made as well as how Pages are Fired to the screens. Understanding the layout of the Control Screen is important, but know that as you get comfortable with MediaShout 7, you can adjust certain elements of the layout to better suit your ministry’s needs.
Menu Bar (Dark grey, at the very top of the diagram).
At the very top of the Control Screen is the Menu Bar. The Menu Bar will give you access to common tools, File, Insert, Edit, etc. These will let you do things such as Opening a Script, Printing/Exporting, Changing Settings, Inserting of Cues and Objects, View Options, and a great number of Help Resources.
Main Ribbon (Bright Green in the diagram)
Below the Menu Bar is the Main Ribbon. The Main Ribbon holds icons for quick insertion of various Cues as well as insertion of Text Box and Media Objects. As new features are added to MediaShout 7, this Main Ribbon will grow with new icons.
Script Area (Pink in the diagram)
The left side of the screen is the Script Area. Above the Script Area is a tab with the Script Name. You can have up to 10 Scripts open at one time (each with its own tab). Many users choose to build a Script for Announcements, another Script for the Worship Service, and a third Script for the Pastor’s Sermon. Each Script is made up of any number of Cues. Each of these Cues will have at least one Page (that can be Fired) as well as a place to Comment on the Cue.
Edit Area (Blue in the diagram)
The middle of the screen by default is the Edit Area (this can be toggled – see Presenter View). This area is where you build each individual Page of the Cues in your Script. When selecting an Object to Edit, the Edit Ribbon (immediately above the Edit Area) will change options based on the type of Object selected. You can also apply Presets to Objects here along with other FX (Effects) settings.
Presenter View (Toggled on via menu bar)
The middle of the screen where the Edit Area is can also be toggled to a Presenter View. This area gives you the ability to see more of your Script, Cues, and Pages for easier Playback while removing the Editing capabilities. This is a great tool for using with volunteers or first-time operators, so they don’t have to worry about editing things by accident. You toggle this by going to the View Menu > Mode > Presenter View or using CTRL+ALT+V.
Layers Tab (Green in the diagram)
The right side has three tabs for various controls and settings. The first tab is the Layers Tab. This tab gives you the ability to rearrange Objects on the Page, change the Background for the Cue, and even hide Objects from displaying at all.
Library Tab (Green in the diagram)
The second tab on the right side is the Library Tab. This tab has quick access to commonly used media files that you can simply drag and drop into your presentation. The contents of the Library Tab are changed by adjusting the Library Folders in the Settings Menu at the top.
Viewers Tab (Green in the diagram)
The last tab on the right side is the Viewers Tab. This tab allows the user to see exactly what is being Fired to various outputs. The top Viewer shows the current Main Display (what the audience is seeing). The bottom Viewer can toggle between what is on the Stage Display or what is coming up next on the Main Display.
Plug-Ins (Orange in the diagram)
Plug-ins are the icons found along the right side of the Control Screen. These do various special functions, like Transitions, Key Objects, Cue Library, and more. As more Plug-Ins are developed and installed by the user, they will appear along this bar.


